G Suite powered by Google Cloud is fantastic for small to enterprise-level businesses looking for communication, store, collaborate and manage solutions. As it allows users to have custom branded email id like [email protected] for free of cost. Unfortunately, from December 6, 2012, mother Google has stopped providing this free service. Not yet, from December 18, 2018, Google has stopped supporting change the primary domain for G Suite Legacy account too. And now, Google doesn’t stop that because they are evil, from January 17, 2020, adding the secondary domain for Google Apps Free account no longer working.
But as we all know in the tech world, this never stopped geeks to find a way around to allow you to be able to send/receive emails with your own domain for Google Apps Free / G Suite legacy account. We will add your domain as alias domain within their Google Apps a.k.a G Suite legacy account with some tweak on Gmail Apps to allow you send/receive emails with your own domain. I know this sounds very tempting and somewhat unbelievable, but it is true.
So when you purchasing Google Apps Free / G Suite legacy-free account, we will set up your domain as alias domain and you will be able to send/receive emails on it. You get Super Admin access, primary domain own and full control over the account. With a one-time small fee and no recurring cost, you will be saving up to thousands of dollars per year.
How to Add Domain Alias in G Suite Legacy?
- Google Admin console as the Super Admin. From the dashboard, click Domains.
NOTE: If you cannot see the Domains icon from the dashboard, click on More controls located at the bottom of your dashboard to reveal the Domains icon. - Add a domain or a domain alias.
- Choose Add a domain alias to primary-domain-name.
- Enter the name of the domain alias you want to add to your account.
- Click Continue and verify domain ownership.
- At this point, you will need to choose which method you wish to use to verify your ownership of the domain.
- Click Verify and continue to set up email delivery.
- Update the domain’s MX records to route mail to Google’s mail servers.
- Click I have completed these steps.

Immediately after you complete the steps above, the status on your Domains page in your Admin console should read as “Updating.” When the domain ownership for your new domain alias is verified, the status will change to “Active.” Please be aware that it can take up to 24 hours after verification for all users to receive their alias email addresses.
Well done! You’ve successfully added your additional domain to G Suites as an alias to send and receive the email. Test by sending an email to your newly added domain, and you will notice email is available to your original domain email.
How to Create and Receive Email with Alias Domain in G Suite Free?
After adding your domain as alias domain, your email address will be generated automatically when you create a new user account with the primary domain. So you will be able to receive emails on the email address with your domain immediately. Remember to set up MX records for your domain and point to Google Apps server.

How to Send Email from Alias Domain in G Suite Free?
By default, when you add alias domain, you will receive emails on that, but if you need to send an email from alias domain. For example: if you own abc.com, xyz.com, example.com and need email on all domains such as [email protected], [email protected], [email protected]. Then you got to do the following configuration.
![]()
- Log in to your original domain email (username with the primary domain).
- At the top right, click Settings (Gear Icon) and then Settings.
- Select the Accounts and Import or Accounts tab.
- In the “Send mail as,” click Add another email address.
- In the window that opens, enter the Name and Email address (username with your alias domain).
- Confirm that “Treat as an alias” is marked, and click the Next step.
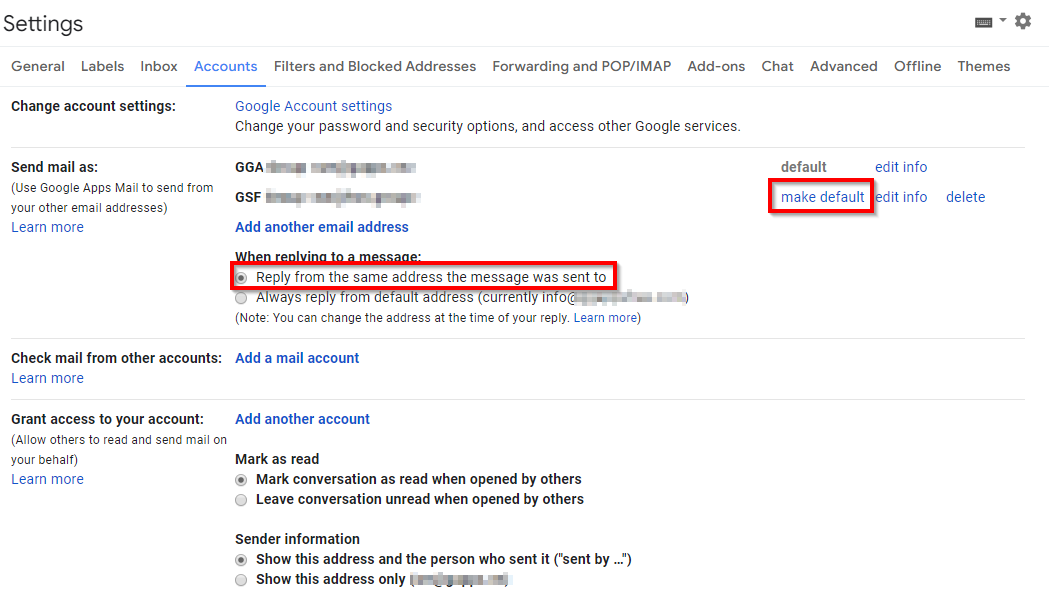
- Now Click on Make Default button on your recently added Alias email address.
- Remember to tick “Reply from the same address the message was sent to” on “When replying to a message as option”
That’s all! Now you can send and receive an email from your alias domain.
I think this is a cool feature for people who is having multiple domains and managed by one person. This will save the cost, and all emails are handled with a single login/console.
Tuesday, January 21, 2020